 | Stella Tutorial: Paper models of 4D polytopes |
With only three dimensions to our world, it can be very hard to visualise
four-dimensional objects.
Stella4D
makes this easier by showing us 3D aspects of these shapes that we can
understand, but there's still nothing better than holding a model in your own
hands, and 4D can lead to some great 3D models.
Projections
4D polytopes can be projected into 3D, but it's still hard to see what's
going on because there's too much clutter obscured inside. It can help to hide
some of the cells in order to get a clearer view of what's going on.
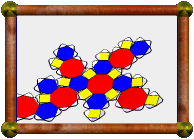
I'll consider 308-Grit as an example, and describe how I
obtained nets for building a paper model.
- Load the model:
 "File→Polyhedron List" or Ctrl+N.
- Type "308" or "grit", hit Enter or click OK.
- First we want to hide all the truncated
cuboctahedron cells, so start by selectng one of them
(Shift+Left-click on one of them. They are the blue ones). It should
become highlighted in white.
- Hide all the blue cells ("Display→Show/Hide Cells of Selected
Color" or just hit "h").
- We want full-size cells, so do Ctrl+Shift+Right-click.
- You should now be looking pretty much at the model we want to make. You
may however want to play with the 4D projection to adjust the sizes as you
wish.
Do this by entering 4D Tumble Mode
(
 or
"Selection→Mouse Selection Modes→4D Tumble Mode"). Then
hold down the Space bar and Right-drag until you get the
model how you want it. You probably want to adjust the perspective so that the
central parts aren't too small, but also so that the outer parts aren't too
thin. or
"Selection→Mouse Selection Modes→4D Tumble Mode"). Then
hold down the Space bar and Right-drag until you get the
model how you want it. You probably want to adjust the perspective so that the
central parts aren't too small, but also so that the outer parts aren't too
thin.
- Click the
 left-and-down arrow button in the top right corner of the view. It
has a small "3" next to it indicating that you will be converting this to a 3D
model. You will be asked to choose what to do about the hidden cells, but you
will almost always want to just choose the default (top) answer, so just hit
Enter.
left-and-down arrow button in the top right corner of the view. It
has a small "3" next to it indicating that you will be converting this to a 3D
model. You will be asked to choose what to do about the hidden cells, but you
will almost always want to just choose the default (top) answer, so just hit
Enter.
- And voila! You have a 3D model that you may treat like any other 3D model.
Open an
 Unfolded Net view to see nets.
19-Tat (the truncated tesseract) is constructed in a
similar way, except that I didn't hide all of one type of cell. Instead I
hand-picked four of the eight truncated cube cells for
hiding. To do this, use Ctrl+h which hides only the selected cell,
instead of h which hides all cells of the same colour.
|
|
Alternatively, you may wish to build models like 308-Grit by creating
each individual projected cell, then gluing them together face-to-face. I used
this method for 133-Srip, and Fr. Magnus Wenninger used
this method for his 4D models. In this
case you need separate nets for each differently-projected cell. So for each
cell you will need, perform the following steps:
- Hide all other cells. Do this as follows:
- Start with all cells unhidden (Ctrl+Shift+h if necessary).
- Hide the one cell of interest (select it with
Shift+Left-click, then hide it with Ctrl+h).
- Toggle the hidden cells (Ctrl+Shift+T). This brings back the
hidden cell, but hides all others.
- As before, click the
left-and-down arrow button to convert this one cell to a
3D base model. Hit Enter to accept the default response from the
dialog box that appears.
Provided you do not change the scale of the original 4D model, the scale for
nets of each projected cell should end up matching.
|
Cross-sections
To see 3D cross-sections of 4D polytopes, use the
 Cross-Section view. Use Ctrl+Left-drag to change the depth at which
the slice is taken. When you get a model you like in the cross-section view,
hit the
left-and-down button in the top right corner of that view to turn it into a
fully-fledged 3D model. Then you can print out nets etc.
Cross-Section view. Use Ctrl+Left-drag to change the depth at which
the slice is taken. When you get a model you like in the cross-section view,
hit the
left-and-down button in the top right corner of that view to turn it into a
fully-fledged 3D model. Then you can print out nets etc.
Cross-sections where the slicing hyperplane passes through vertices of the
polychoron are often particularly interesting, and sometimes a little simpler
to make. You can step through these with the yellow left and right arrow
buttons at the top of the Cross-Section view, or just by hitting the left or
right arrow keys on the keyboard if the Cross-Section view is selected.
|


 To see the 3D nets of 4D polytopes, just look at the Unfolded Net view