|
Great Stella
and
Stella4D
provide most of the models from Fr. Magnus Wenninger's books Polyhedron
Models and Dual Models, but what about some of the other interesting
models to be found on
Magnus's website?
In particular, the hollow models based on spherical designs such as
these are very appealing. Well, with a bit of work they can indeed be
made in Stella. This tutorial describes how, and will focus on those two
models in particular.
Note: These models are complex. To prevent Stella from carrying out
any unnecessary and lengthy operations during this process, I suggest closing
any stellation or net views, and if the Info window is open, close the
Stellation and Net tabs there too.
Step 1. Draw the desired patterns on a geodesic sphere:
- Typically, start with an icosahedron and use "Poly→Create Geodesic
Sphere" with whatever frequency you need. A bit of analysis and
experimentation in Stella shows that the model on the left (in Magnus's
photo) is based on a 14-frequency sphere, and the other is based on
12-frequency.
- Change all face colors to black ("Color→Set All Face Colors").
- Display edges, since now it's all black! (Hit "e"). You may also
want to change the edge color to show up with "Color→Set Edge
Color".
- Enter Color mode
 (click on the palette icon).
- Shift+Right click to select a face, then hit Shift+C to
choose a color for it.
- Shift+Left click on other faces to use this color on other faces
too. Even hold down Shift+Left and drag the mouse along a path of
faces which should receive the same color.
- I do this as long as colors follow the symmetry group. Otherwise use
Ctrl instead of Shift above to color single faces one at a
time (rather than all faces of same type).
- You can turn off edge display once a pattern emerges. The edges may just
become clutter at that point.
Step 2. Convert from patterned sphere to hollow model:
- Set scale you want for model using one of the items from the Scale
menu, e.g. "Scale→Base Polyhedron Radius".
- Put this in memory 1 (type "m1" or use "Edit→Put Model in
Memory→Memory 1").
- Set scale to slightly smaller size (this will represent the inner surface
of the hollow model).
- "Edit→Add/Blend from Memory→Memory 1".
- Try selecting a black face and hit "h" to hide them. This gives
you an idea of how it will look, and lets you judge whether you have the
desired thickness between layers. Unhide them again when ready (hit
"h" again).
- Put this new model in memory 2 (type "m2").
- Enter Faceting mode
 and open a faceting preview window
 . .
- Create the facets of a negative space model as follows:
- Tick "Options→Maintain Reflexibility" if black parts
follow reflection symmetries.
- Ctrl+Right click on each visible black triangle until all
appear in faceting preview window.
- Hide whole outer layer so that we can select faces from the inner
layer. Use "Display→Show/Hide One Part of Compound" to
achieve this.
- Again, Ctrl+Right click on each black face until all appear in
the faceting preview window.
- Create facets, in the faceting preview window, to connect the two
layers together. As mentioned, we are creating the negative space of what
we actually want here. See
Faceting Mode in the
manual for details about how to create facets. This is the slowest step as
you have to click on the vertices of each required facet in turn.
- Create the faceted model (using Ctrl+Shift+F, "Poly→Create
Faceted Polyhedron" or click on
 in the Faceting
Preview window's title bar). in the Faceting
Preview window's title bar).
- If the lateral faces which connect the two layers should be all the same
color, then change the color of the model to that color (Ctrl+Shift+C).
- "Edit→Add from Memory→Memory 2", and say yes to delete
coincident faces in pairs.
- If you want the lateral faces to match the colors of their attached faces
in the outer and inner layer, then select one of the lateral faces and use
"Color→Take Color from Neighbouring Faces". With some magic,
Stella should figure it out!
- And if all went well, voila!
Well done if you followed all that! The reason for not faceting the positive
straight away, rather than the negative, is that we want to retain the colors
we drew on the sphere.
Finally, these models have a great many facial planes, which causes havoc
for stellation, so you probably won't be able to stellate these models. This
also means you may not be able to create nets directly. If that is required,
you may need to use Faceting mode to create simpler pieces of the model, for
which nets can be generated.
|
 |
 |
| Step 1. Spherical patterns |
| |
 |
 |
| Step 2. Negative space (colored nicely
for clarity. Colors will be different during tutorial) |
| |
 |
 |
| The finished models |
| |
 |
 |
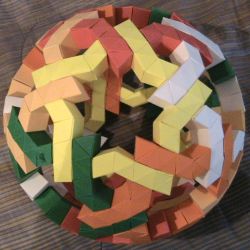
| Some other models made using this
technique |
| |
 |
| A paper model by
Giacomo Artoni designed using this
tutorial |
|