| Home > Gallery > My Models > Polyhedron Model-Making Tips | |
| Prev (Miscellaneous Polyhedra) | Next (Polyhedral Bookcase) |
Polyhedron Model-Making Tips |

Pictured above are the tools I use for constructing my polyhedra:
- A metal ruler and large doll-making needles for scoring edges.
- Scissors and glue for obvious reasons.
- An old piece of card for putting a blob of glue on. It's almost solid glue now!
- Wooden skewers for applying the glue. Possibly not the best thing, but they were the first thing I found and they worked, so I'm still using them. They don't require much cleaning like brushes, and stray bristles don't cause problems either.
- Tweezers, including a long pair with angled tip, for squishing those tabs together.
- The top cut off a coat hanger, for those hard to reach tabs (I practically never need this though).
- I also have some wooden clothes pegs, taken apart and put together backwards as recommended by Magnus Wenninger, for clamping tabs as they glue (but again, I almost never use these).
- And finally of course, a Buffy pencil case to put these tools in!

|
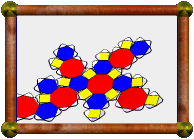
A box with compartments can be very useful too when working on a model with many different parts. Here the box contains all the parts required for the pseudo great rhombicuboctahedron. |
To make models, you'll need to start with nets. You can print these out from Stella4D, Great Stella or Small Stella. Score along the edges, cut out the nets leaving tabs around the outside, crease along all the edges, then glue the pieces together (tab to tab).
Here are a few general tips for building models.
- I use paper between 120 and 140 gsm (normal printing paper is 80 gsm). I used to use Canson's Vivaldi paper, but I'm not sure it was acid free. Now I use paper from Doggitt Pedigree papers, which have a huge range and their metallic papers are great. I find thick card leads to a less accurate model. Acid-free paper should fade less over the years, especially if the models get any direct sunlight.
- Be careful to score on the front of the paper for a convex fold (mountain fold), or on the back for a concave fold (valley fold). Make tiny pin-pricks at each end of lines to be scored on the back, so you know where to score. The program has the option to use dashed line when printing concave edges, but I prefer not to see them in the finished model. If in doubt about which ones are which, print a page with dashed lines on normal paper as a reference.
- I use double tabs. This means that I usually leave tabs on all edges around a net, and glue the tabs to each other where faces meet. This makes the edges more "symmetrical", since both sides have a tab, and it is easier to squish the tabs together with a pair of tweezers.
- Where faces attach very sharply (a small dihedral angle), I often use a single tab, and glue it under the joining face. Otherwise the final edge becomes too "bulky".
- I usually try to use some kind of internal support to give the model rigidity. I hate "floppy" polyhedra (eg see the great hexacronic icositetrahedron). Stella has a number of features to help with this, including a mode for creating new polygons inside the model using existing vertices, which you can print out and glue inside for support. A lot of people use thicker card than me and don't seem to worry about this though.
- When gluing a part behind a surface that will be visible (eg when using single tabs, or for extra support, eg see the great dodecahedron), don't put the glue behind the visible surface. Instead put it on the surface being glued to it (the tab). This is because sometimes the moisture in the glue can cause wrinkling, and it's better to avoid any wrinkles in the visible surfaces. Also, don't put glue all over largish areas, just near their edges, to avoid further wrinkling.
- How do you glue the last piece in?!
- Gluing the last piece in can be tricky, because you can't get inside to squeeze the tabs together. Here again I recommend the double tab method. Gluing tabs to each other rather than gluing one tab under the neighbouring surface halves the angle between the surfaces being glued, so the paper's natural springiness helps to push those tabs together.
- If the last flap is a pentagon, say, then one edge is already connected and four others remain to be glued. You could try gluing another two of these, one at a time, if your model flexes enough to still allow you to get glue onto the last tabs afterwards, but your paper may get bent and creased. I would usually put glue on all the remaining edges and do them all at once. If using double tabs, I'd recommend alternating glue on the top or bottom tab in each pair. Experience says it produces more even results, as there's no imbalance between the parts being glued, which can lead to edges not quite aligning before the glue locks things in place.
- Finally, you often need to figure out how to get that last piece in on a case-by-case basis. I've documented this for various models I've made. Here are some models where extra thought had to be put in to figure out how to finish them off.
Good luck,
Robert Webb.
| Home > Gallery > My Models > Polyhedron Model-Making Tips | |
| Prev (Miscellaneous Polyhedra) | Next (Polyhedral Bookcase) |