Page 1 of 1

How do I make this little beauty, please?

Posted: Sat Mar 30, 2013 8:31 pm
by pollyhendra
Hi,
Newbie wants to know how to make this stunning 'hoosiewatsit'...

Image


Any ideas please. It came from Father Magnus's website.

Posted: Sun Mar 31, 2013 5:02 am
by robertw
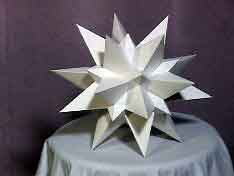
To save people clicking, here's the model in question:

Image

There are (at least) two ways to construct this in Great Stella or Stella4D:

(1) It's a stellation of the dodecadodecahedron, shown below:

Image

So load that model, switch to the stellation view, and hit the Up arrow until you see the model you want (25 times to be precise!). Now look at the net view and the netw required to build it will appear, ready for printing.

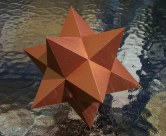
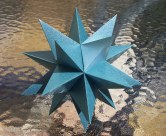
(2) If you didn't know what it was a stellation of, you could still make this in Stella. Looking at it, it appears to be a compound of a small stellated dodecahedron and a great stellated dodecahedron, ie these two:

Image Image

You can add them together easily enough in Stella, but how to get the relative scales to match? Well, it appears they have been scaled so that their edges bisect each other, so you need to scale them so that their edges are the same distance from the centre of the model. This is known as the midradius, for uniform polyhedra.

So load the small stellated dodecahedron, and set its midradius to some known distance, say 10, using "Scale->Midradius / Reciprocation Radius". Put this in a memory slot ("Edit->Put in Memory->Memory 1" or just type "m1").

Now load a great stellated dodecahedron, and set its scale the same way (set midradius to 10). Now add it to the model in memory with "Edit->Add/Blend from Memory" and voila! At first it may be all one colour, because the colour was retained from when it was put in memory. Ask Stella to do it's auto-colouring by reselecting "Color->Basic Color Scheme->Auto Color". A quick way to do this is to hit Tab twice. Once switches to single colour mode, and again switches back to auto-colour. Now you're ready to print nets.

Finally, if a model doesn't have a single midradius, that is edges are not all the same distance from the centre, you can still resize it based on the distance of one particular edge from the centre. Go to Measurement Mode and Shift+Left-click on the edge of interest, then click the dot-in-a-circle button that appears at the top-right of each view when in this mode. This will measure the distance from the edge to the centre of the model. To set this to another length, use "Scale->Measured Distance".

Hope all that made sense!
Rob.

Posted: Sun Mar 31, 2013 6:15 am
by pollyhendra
Thanks for your time and such a detailed description, Robert.
Not a natural mathematician - will have to spend more time getting to know the program I can see. You've probably saved me a month or 2 learning how to use it.

Posted: Sun Mar 31, 2013 8:20 am
by robertw
Glad I could help. The good thing about Stella (hopefully) is that you have access to all these shapes without any need to know about maths. At least it's a very different kind of maths. Spatial thinking rather than numbers.

Rob.

Posted: Tue Apr 02, 2013 9:35 pm
by guy
One interesting opportunity here comes from the fact that the faces come in parallel sets. On each side, one face from the small stellated dodecahedron is parallel to one from its great stellated cousin. Since these figures have opposite sides, also parallel, that makes four parallel faces in all.

So you only need 6 colours of card to make an awesomely "how does that work?" colouring pattern.

Posted: Tue Apr 16, 2013 6:24 am
by oxenholme
--.

Posted: Sun Apr 21, 2013 6:52 am
by pollyhendra
robertw wrote:Glad I could help. The good thing about Stella (hopefully) is that you have access to all these shapes without any need to know about maths. At least it's a very different kind of maths. Spatial thinking rather than numbers.

Rob.
Sorry Robert, just trying to take shortcuts. So busy and haven't till now had time to spend much time learning the software. Just made a gorgeous great stellated dodecahedron lamp. So I think I'm ready for my next challenge.
Thanks again.

Posted: Sat Aug 03, 2013 2:48 am
by pollyhendra
Have made a model which is lovely but I have had trouble with the final stages of fitting.
Could you please tell me how to go about making a convex core... or base of some sort for it please?

Posted: Sat Aug 03, 2013 5:39 am
by robertw
If it was me, I'd use Faceting Mode (see the manual) to create the little triangle shown below, and print out a stack of them. For the most part, I would put the external pieces together as normal, using the double-tab method, and then attach one of these extra triangles to the already glued tabs at each appropriate place. Towards the end of the model you could build the two types of peaks each surrounded by their own internal triangles, and then glue the peaks to each other at those triangles. You don't need a whole convex model in the middle (and the figure doesn't really lend itself to that).

Image

Posted: Sun Aug 04, 2013 1:27 am
by pollyhendra
I see.... sort of. Too many weird angles for merging. And these angles need strong support so will use the triangle idea, thanks.
Doesn't look like there's an easy way.
My first model was trialed at about 20cm long and in copy paper. (I didn't trust the template - not realising the paper would bend into shape).
Hopefully the next will be easier with card and perhaps I'll make it larger.
Promise photos if it looks anything like the sample.